Android Pitel VoIP
android_pitel_voip
Integrate VoIP call to your project
![]()
This document provides detailed instructions for integrating VoIP functionalities, including registering an account, making calls, and logging out using SdkPitel.
Demo
1. Introduction
Overview
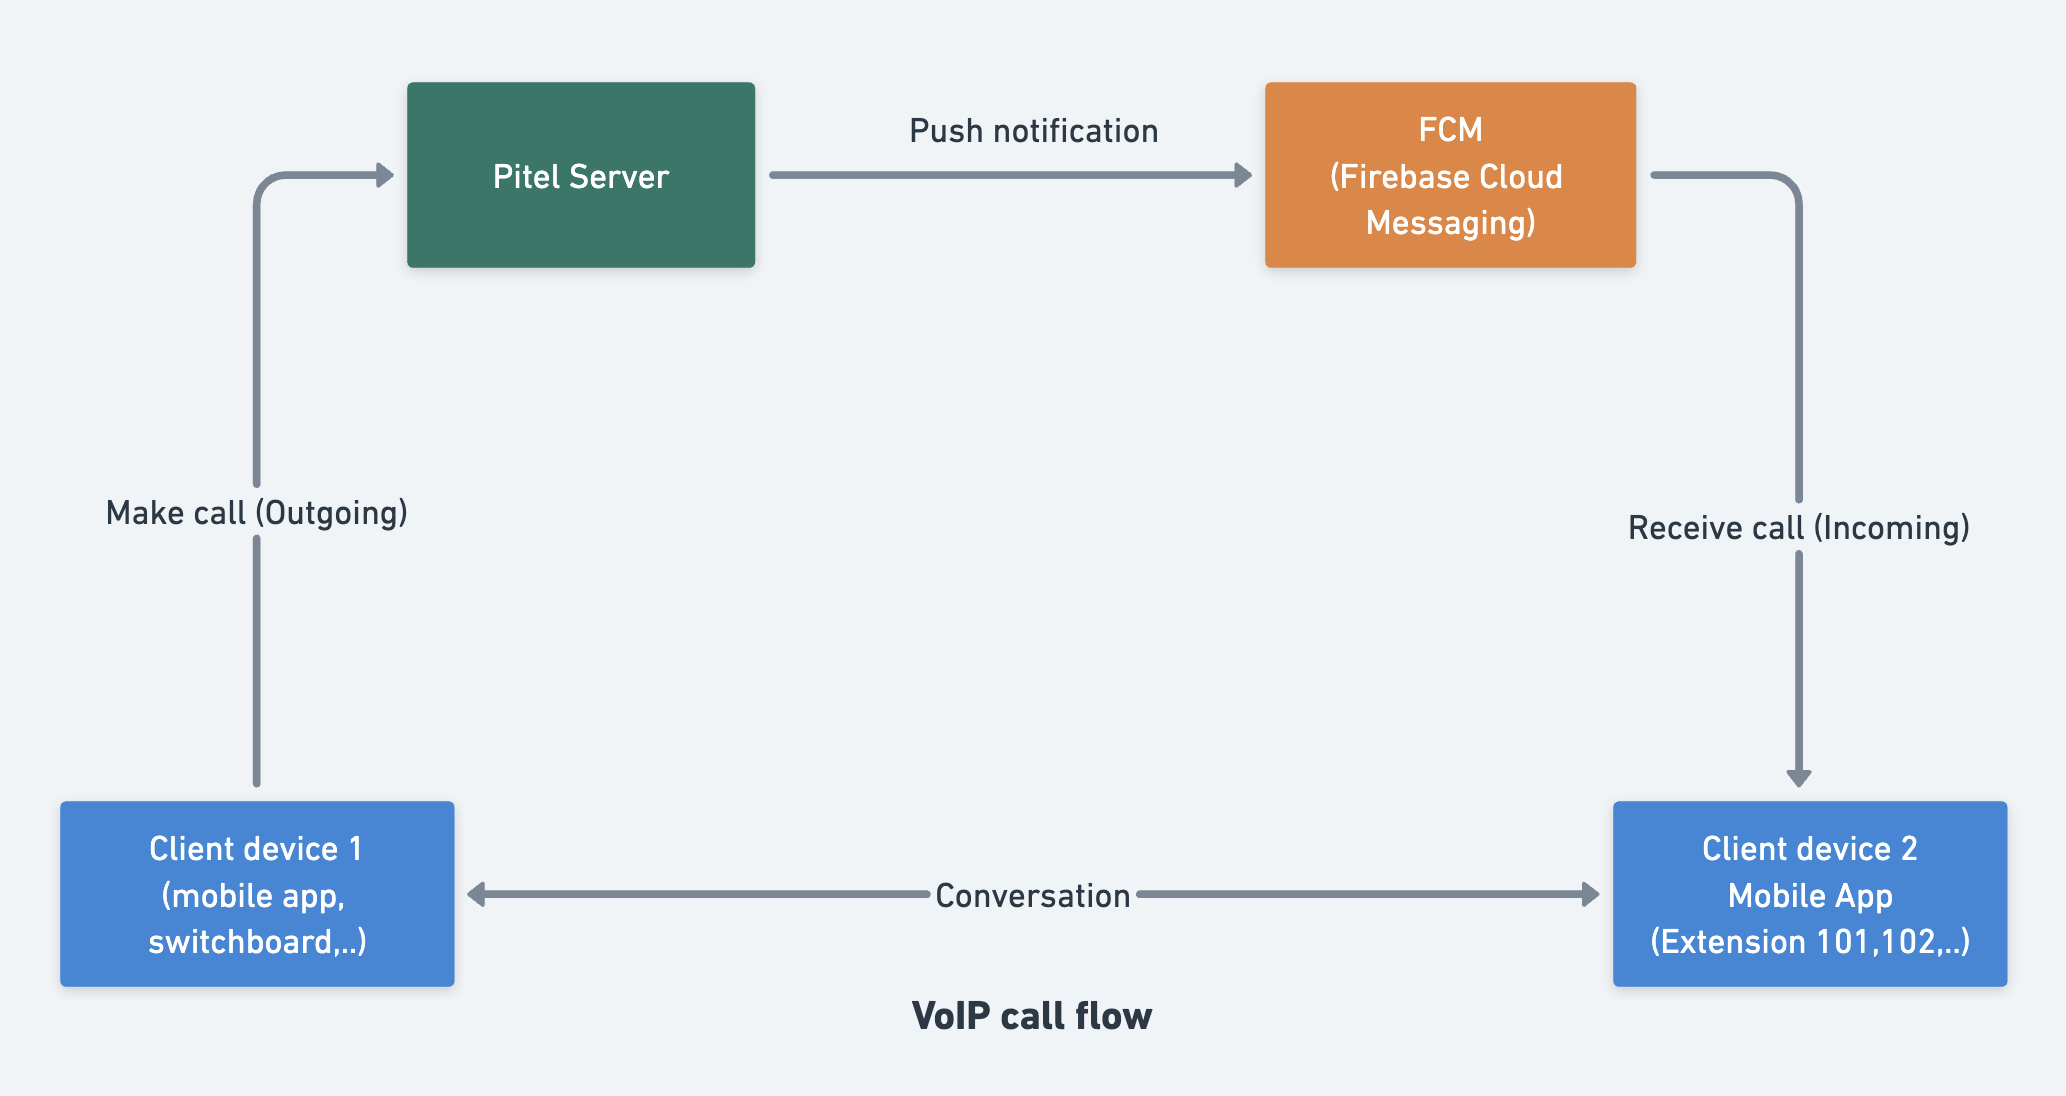
When user make call from Pitel Connect app, Pitel Server pushes a notification for all user login (who receives the call).
Features
- Register/Unregister Extension
- Make and Receive Calls (outgoing call, incoming call)
- Toggle Microphone
- Toggle Speaker
- Send DTMF
- Hold/Un hold call
- Blind transfer call
2. System Requirements
- Android SDK 21+
targetSdkVersion >= 33- Firebase configured for Android
google-services.jsonfile placed inandroid/app/
3. Library Installation
3.1 Configure proguard rules.
The following rule needs to be added in the proguard-rules.pro to avoid obfuscated keys.
-keep class com.mobile.tech.** { *; }
-keep interface com.mobile.tech.** { *; }
-keepclassmembers class com.mobile.tech.** { public <init>(...); }
3.2. Configure Firebase
- Go to Firebase Console.
- Create or select an existing Firebase project. Follow documentation for check PUSH_NOTIF.md. setup push notification (for Android).
- Add an Android application using your Package ID.
- Download
google-services.jsonand place it inandroid/app/. - Enable Cloud Messaging API in Google Cloud Console.
3.2. Add Dependencies
Follow the docs to create a github personal access token.
Update settings.gradle.kts:
pluginManagement {
    repositories {
        .....
        mavenCentral()
        mavenLocal()
        maven(url = "https://jitpack.io")
        maven {
            url = uri("https://maven.pkg.github.com/tel4vn-team/android-pitel-voip")
            credentials {
                username = USERNAME_GITHUB
                password = TOKEN_GITHUB
            }
        }
    }
}
dependencyResolutionManagement {
    repositoriesMode.set(RepositoriesMode.FAIL_ON_PROJECT_REPOS)
    repositories {
        .....
        mavenCentral()
        mavenLocal()
        maven(url = "https://jitpack.io")
        maven {
            url = uri("https://maven.pkg.github.com/tel4vn-team/android-pitel-voip")
            credentials {
                username = USERNAME_GITHUB
                password = TOKEN_GITHUB
            }
        }
    }
}
Update android/app/build.gradle.kts:
dependencies {
    implementation("com.pitel:pitelvoip:1.0.3") // Pitel VoIP library
    implementation("com.google.firebase:firebase-messaging-ktx:23.3.1")
}
Update android/build.gradle:
classpath 'com.google.gms:google-services:4.3.10'
If use plugins block android/build.gradle:
plugins {
    id("com.google.gms.google-services") version "4.3.10" apply false
}
Apply Firebase plugin in android/app/build.gradle:
apply plugin: 'com.google.gms.google-services'
4. Configure AndroidManifest.xml
Add necessary permissions:
<uses-permission android:name="android.permission.INTERNET" />
<uses-permission android:name="android.permission.ACCESS_NETWORK_STATE" />
<uses-permission android:name="android.permission.RECORD_AUDIO" />
<uses-permission android:name="android.permission.MODIFY_AUDIO_SETTINGS"/>
<uses-permission android:name="android.permission.FOREGROUND_SERVICE"/>
<uses-permission android:name="android.permission.RECEIVE_BOOT_COMPLETED"/>
<uses-permission android:name="android.permission.POST_NOTIFICATIONS" />
Add the FCM service:
<service android:name="com.google.firebase.messaging.FirebaseMessagingService"
        android:exported="false">
   <intent-filter>
      <action android:name="com.google.firebase.MESSAGING_EVENT" />
   </intent-filter>
</service>
5. Custom UI for call screen
Change color in your file res/values/colors.xml (light/night)
<?xml version="1.0" encoding="utf-8"?>
<resources>
    <color name="bg_call_screen">#4CAF50</color>
    <color name="bg_group_action">#FFFFFF</color>
    <color name="color_text_group_action">#212121</color>
    <color name="color_icon_group_action">#212121</color>
    <color name="color_group_action_disable">#CECECE</color>
    <color name="color_icon_close">#212121</color>
    <color name="color_text_display">#212121</color>
    <color name="bg_dial_pad_dialog">#FFFFFF</color>
    <color name="color_btn_digit">#FFFFFF</color>
    <color name="color_text_digit">#212121</color>
    <color name="color_text_dial_pad">#212121</color>
    // Foreground service notification
    <string name="sip_service_title">SIP Service is running</string>
    <string name="sip_service_content">Please do not disable the service to ensure a stable connection</string>
    // Back to call screen notification
    <string name="back_to_call_screen_title">Ongoing call</string>
    <string name="back_to_call_screen_content">Tap to return to the call screen</string>
</resources>
Properties
| Prop | Description | Type |
|---|---|---|
| bg_call_screen | Background color of the call screen | Hex color |
| bg_group_action | Background color for group action buttons (e.g., mic, speaker, hold...) | Hex color |
| color_text_group_action | Text color on group action buttons | Hex color |
| color_icon_group_action | Icon color on group action buttons | Hex color |
| color_group_action_disable | Color for disabled state of group action buttons (includes text & icon) | Hex color |
| color_icon_close | Icon color of the close button in the dial pad | Hex color |
| color_text_display | Text color for phone number or call info display | Hex color |
| bg_dial_pad_dialog | Background color of the dial pad | Hex color |
| color_btn_digit | Background color of digit buttons in the dial pad | Hex color |
| color_text_digit | Text color of digits on the digit buttons | Hex color |
| color_text_dial_pad | General text color in the dial pad (can be used for headers/subtitles) | Hex color |
| sip_service_title | The title displayed on the notification when the SIP service is running in the foreground. | String |
| sip_service_content | The content text shown in the notification indicating that a call is currently in progress | String |
| back_to_call_screen_title | The title used for the notification that allows the user to quickly return to the ongoing call screen | String |
| back_to_call_screen_content | The content text of the notification prompting the user to tap and return to the call interface | String |
6. Example
Please clone repository and run Demo_SDK or checkout repo github to get example
7 Usage
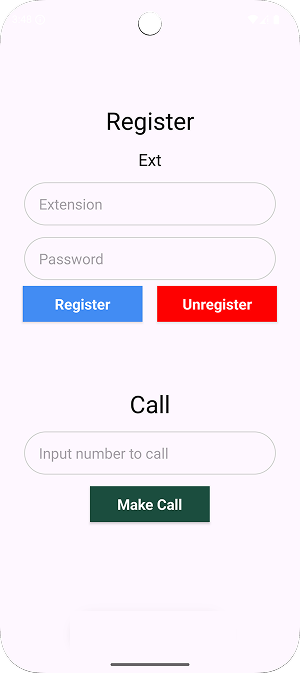
Registering an Account
To register a user with SdkPitel, ensure that the username and password fields are not empty before proceeding.
SdkPitel.initConfig(
    context = this,
    callModel = CallModel(
        accountFrom = "${EXTENSION_CALLER}",
        accountFromName = "${EXTENSION_CALLER_NAME}",
        passwordFrom = "${PASSWORD}"
    ),
    callBackStatus = { status, callModel ->
        when (status) {
            CallEvent.ONGOING_CALL -> Log.d("MainActivity", "On going call...")
            CallEvent.CONNECTING -> Log.d("MainActivity", "Registering...")
            CallEvent.DISCONNECTED -> Log.d("MainActivity", "PitelStatus.DISCONNECTED")
            CallEvent.CONNECTED -> Log.d("MainActivity", "Registered")
            CallEvent.LOG_OUT -> Log.d("MainActivity", "Successfully unregistered!")
            CallEvent.REGISTER_FAILED -> Log.d("MainActivity", "REGISTER FAILED. PLEASE RETRY")
            else -> Log.d("MainActivity", "Status: $status - PitelStatus.OTHERS")
        }
    },
    customCallScreen = CallActivity::class.java, // default CallActivity
)
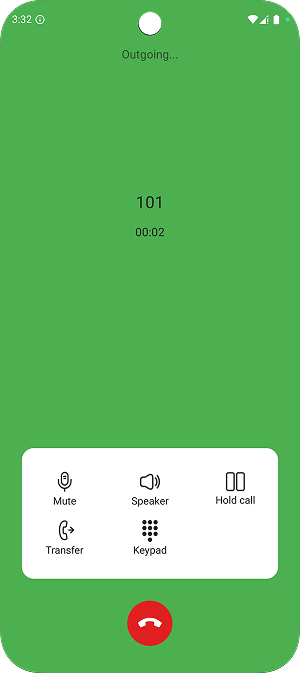
Making outgoing call
Before making a call, ensure that the recipient's phone number is provided.
SdkPitel.openCall(
    context = this,
    callModel = CallModel(
        accountFrom = "${EXTENSION_CALLER}",
        accountFromName = "${EXTENSION_CALLER_NAME}",
        accountTo = "${EXTENSION_CALLEE}",
        accountToName = "${EXTENSION_CALLEE_NAME}",
        isIncoming = false,
    ),
)
Logging Out
To unregister a user from SdkPitel, use the following method:
SdkPitel.logOutSdkPitel(this) {}
8. Example MainActivity.kt
Update MainActivity.kt to initialize Firebase and SdkPitel with separate functions:
import android.os.Bundle
import androidx.appcompat.app.AppCompatActivity
import androidx.appcompat.widget.AppCompatButton
import androidx.appcompat.widget.AppCompatEditText
import android.util.Log
import com.mobile.tech.sdk.SdkPitel
import com.mobile.tech.sdk.firebase.CallNotification
import com.mobile.tech.sdk.ui.call.CallActivity
import com.mobile.tech.sdk.model.CallModel

class MainActivity : AppCompatActivity() {
    private lateinit var txtInputCall: AppCompatEditText
    private lateinit var txtUser: AppCompatEditText
    private lateinit var txtPass: AppCompatEditText

    override fun onCreate(savedInstanceState: Bundle?) {
        super.onCreate(savedInstanceState)
        setContentView(R.layout.activity_main)

        initView()
        setupListeners()
    }

    private fun initView() {
        txtInputCall = findViewById(R.id.txtInputCall)
        txtUser = findViewById(R.id.txtUser)
        txtPass = findViewById(R.id.txtPass)
    }

    private fun setupListeners() {
        findViewById<AppCompatButton>(R.id.btnRegister).setOnClickListener { registerUser() }
        findViewById<AppCompatButton>(R.id.btnCall).setOnClickListener { makeCall() }
        findViewById<AppCompatButton>(R.id.btnLogout).setOnClickListener { logoutUser() }
    }

    private fun registerUser() {
        if (txtUser.text.toString().isNotEmpty() && txtPass.text.toString().isNotEmpty()) {
            SdkPitel.initConfig(
                context = this,
                callModel = CallModel(
                    accountFrom = txtUser.text.toString(),
                    accountFromName = txtUser.text.toString(),
                    passwordFrom = txtPass.text.toString()
                ),
                callBackStatus = { status, callModel ->
                    if (isFinishing) {
                        return@initConfig
                    }
                    handleCallStatus(status, callModel)
                },
                customCallScreen = CallActivity::class.java,
            )
        } else {
            Log.d("MainActivity", "Please enter both username and password!")
        }
    }

    private fun makeCall() {
        if (txtInputCall.text.toString().isNotEmpty()) {
            SdkPitel.openCall(
                context = this,
                callModel = CallModel(
                    accountFrom = txtUser.text.toString(),
                    accountTo = txtInputCall.text.toString(),
                    accountToName = txtInputCall.text.toString(),
                    isIncoming = false,
                ),
            )
        } else {
            Log.d("MainActivity", "Please enter the recipient's username!")
        }
    }

    private fun logoutUser() {
        SdkPitel.logOutSdkPitel(this) {
            Log.d("MainActivity", "Not registered!")
        }
    }

    private fun handleCallStatus(status: CallEvent, callModel: CallModel?) {
        when (status) {
            CallEvent.ONGOING_CALL -> Log.d("MainActivity", "On going call...")
            CallEvent.CONNECTING -> Log.d("MainActivity", "Registering...")
            CallEvent.DISCONNECTED -> Log.d("MainActivity", "PitelStatus.DISCONNECTED")
            CallEvent.CONNECTED -> Log.d("MainActivity", "Registered")
            CallEvent.LOG_OUT -> Log.d("MainActivity", "Successfully unregistered!")
            CallEvent.REGISTER_FAILED -> Log.d("MainActivity", "REGISTER FAILED. PLEASE RETRY")
            else -> Log.d("MainActivity", "Status: $status - PitelStatus.OTHERS")
        }
    }
}
9. Testing Push Notifications
8.1. Using Firebase Console
- Go to Firebase Console > Cloud Messaging.
- Click Send New Message.
- Select the Android app and enter the FCM token.
- Click Send Test Message.
8.2. Or Sending a Push Notification with cURL
curl --location 'https://fcm.googleapis.com/v1/projects/{project_id}/messages:send' \
--header 'Content-Type: application/json' \
--header 'Authorization: Bearer {access_token}' \
--data '{
    "message": {
        "notification": {
            "title": "",
            "body": ""
        },
        "data": {
            "uuid": "77712f3-9b56-4e26-96ea-382ea1206477",
            "nameCaller": "Pitel Voip",
            "phoneNumber": "101",
            "appName": "Pitel Connnect",
            "callType": "CALL"

        },
        "apns": {
            "headers": {
                "apns-priority": "1",
                "sound": ""
            },
            "payload": {
                "aps": {
                    "mutable-content": 1,
                    "content-available": 1
                }
            }
        },
        "android": {
            "priority": "high"
        },
        "token": "{fcm_token}"
    }
}'
10. Troubleshooting
- Ensure Cloud Messaging API is enabled in Google Cloud Console.
- Verify
google-services.jsonis correctly placed inandroid/app/. - On Android 13+, ensure POST_NOTIFICATIONS permission is granted.
This guide provides step-by-step instructions to integrate VoIP and push notifications into an Android application. If any issues arise, review the steps or contact technical support.