React Native Pitel VoIP
react-native-pitel-voip
Integrate Voip call to your project

react-native-pitel-voip is package support for voip call. Please contact pitel
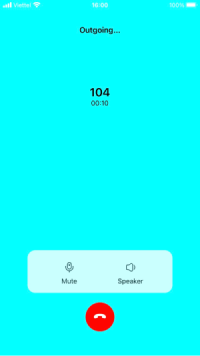
Demo

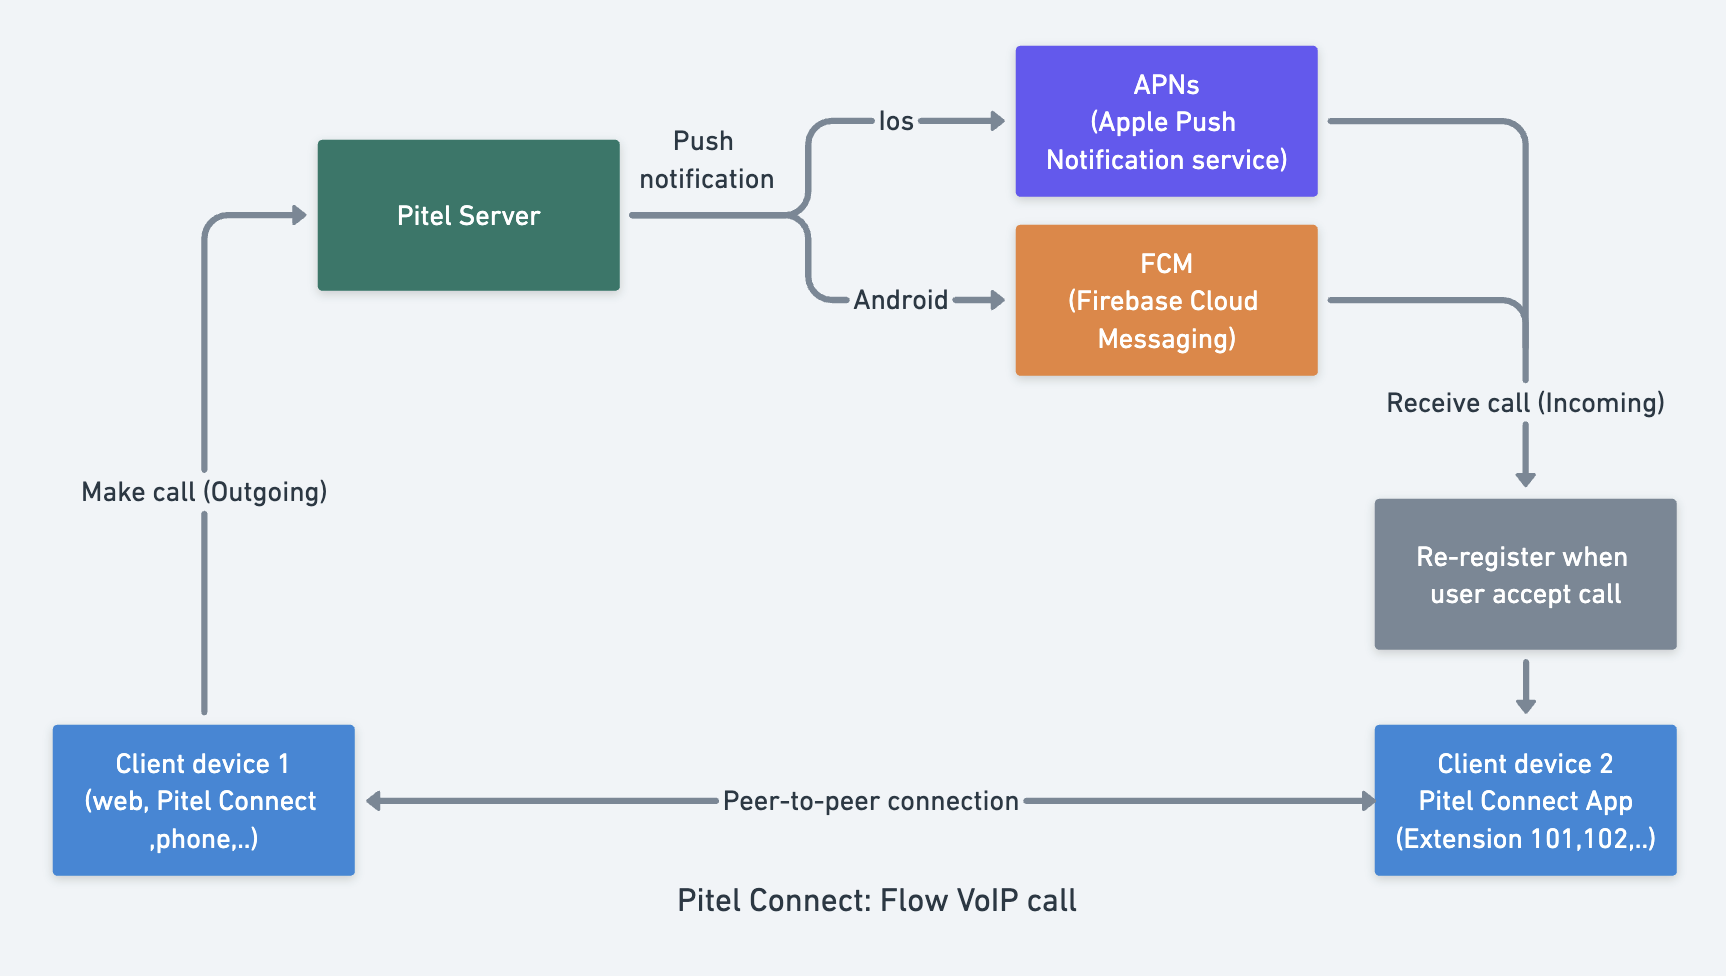
Pitel Flow
When user make call from Pitel app, Pitel Server pushes a notification for all user login (who receives the call). When user "Accept" call, extension will re-register to receive call.
Features
- Register Extension
- Call
- Hangup
- Turn on/off micro
- Turn on/of speaker
Installation
- Install Packages Add pubspec.yaml:
yarn add react-native-pitel-voip@1.1.4
- Installing dependencies into a bare React Native project
yarn add react-native-callkeep@4.3.13 @react-native-firebase/app@18.1.0 @react-native-firebase/messaging@22.1.0 react-native-background-timer@2.4.1 react-native-get-random-values@1.9.0 react-native-incall-manager@4.2.0 react-native-voip-push-notification@3.3.2 uuid@9.0.0 pitel-react-native-webrtc pitel-sdk-for-rn@0.0.6 @react-native-async-storage/async-storage@1.19.1 react-native-permissions@4.0.4 react-native-full-screen-notification-incoming-call@1.0.1 react-native-base64@0.2.1 utf8@3.0.0 @react-native-webrtc@124.0.6
- Pod install
cd ios
pod install
-
Pushkit/ Push notification - Received VoIP and Wake app from Terminated State. Note Please check PUSH_NOTIF.md. setup Pushkit (for IOS), push notification (for Android).
-
Configure Project
Android:
- In styles.xml:
  <style name="incomingCall" parent="Theme.AppCompat.Light.NoActionBar">color
  <!-- Customize status bar color   -->
    <item name="colorPrimaryDark">#000000</item>
  </style>
- In file
android/app/main/AndroidManifest.xml. Example
 <manifest...>
    ...
    <!--Request permission-->
    <uses-permission android:name="android.permission.INTERNET" />
    <uses-permission android:name="android.permission.RECORD_AUDIO" />
    <uses-permission android:name="android.permission.MODIFY_AUDIO_SETTINGS" />
    <uses-permission android:name="android.permission.ACCESS_NETWORK_STATE" />
    <uses-permission android:name="android.permission.BLUETOOTH" />
    <uses-permission android:name="android.permission.BLUETOOTH_CONNECT" />
    <uses-permission android:name="android.permission.READ_PHONE_STATE" />
    <uses-permission android:name="android.permission.PERMISSIONS.ANDROID.POST_NOTIFICATIONS" />

    <uses-permission android:name="android.permission.FOREGROUND_SERVICE_PHONE_CALL" />
    <uses-permission android:name="android.permission.USE_FULL_SCREEN_INTENT" />
    <uses-permission android:name="android.permission.VIBRATE" />
    <uses-permission android:name="android.permission.FOREGROUND_SERVICE" />
    <uses-permission android:name="android.permission.WAKE_LOCK" />
    <uses-permission android:name="android.permission.DISABLE_KEYGUARD" />

    <!--Android 14+-->
    <uses-permission android:name="android.permission.MANAGE_OWN_CALLS" />

    ...
    <!--show when lock screen-->
    <application ...>
      <activity android:name="com.reactnativefullscreennotificationincomingcall.IncomingCallActivity"
        android:theme="@style/incomingCall"
        android:launchMode="singleTask"
        android:excludeFromRecents="true"
        android:exported="true"
        android:showWhenLocked="true"
        android:turnScreenOn="true"
      />
      <activity android:name="com.reactnativefullscreennotificationincomingcall.NotificationReceiverActivity"
        android:theme="@style/incomingCall"
        android:launchMode="singleTask"
        android:excludeFromRecents="true"
        android:exported="true"
        android:showWhenLocked="true"
        android:turnScreenOn="true"
      />
      <service
        android:name="com.reactnativefullscreennotificationincomingcall.IncomingCallService"
        android:enabled="true"
        android:stopWithTask="false"
        android:foregroundServiceType="phoneCall"
        android:exported="true"
      />
      ...
    </application>
 </manifest>
- In file
android/gradle.properties
android.useFullClasspathForDexingTransform = true
- In file
android/app/build.gradle.
apply plugin: 'com.google.gms.google-services'
- In file
android/build.gradle.
buildscript {
    ext {
        ...
        minSdkVersion = 24
        compileSdkVersion = 35
        targetSdkVersion = 35
    }
    ...
    dependencies {
        ...
        classpath 'com.google.gms:google-services:4.4.0'
    }
}
- Config bypass lockscreen LOCK_SCREEN_BYPASS.md
IOS
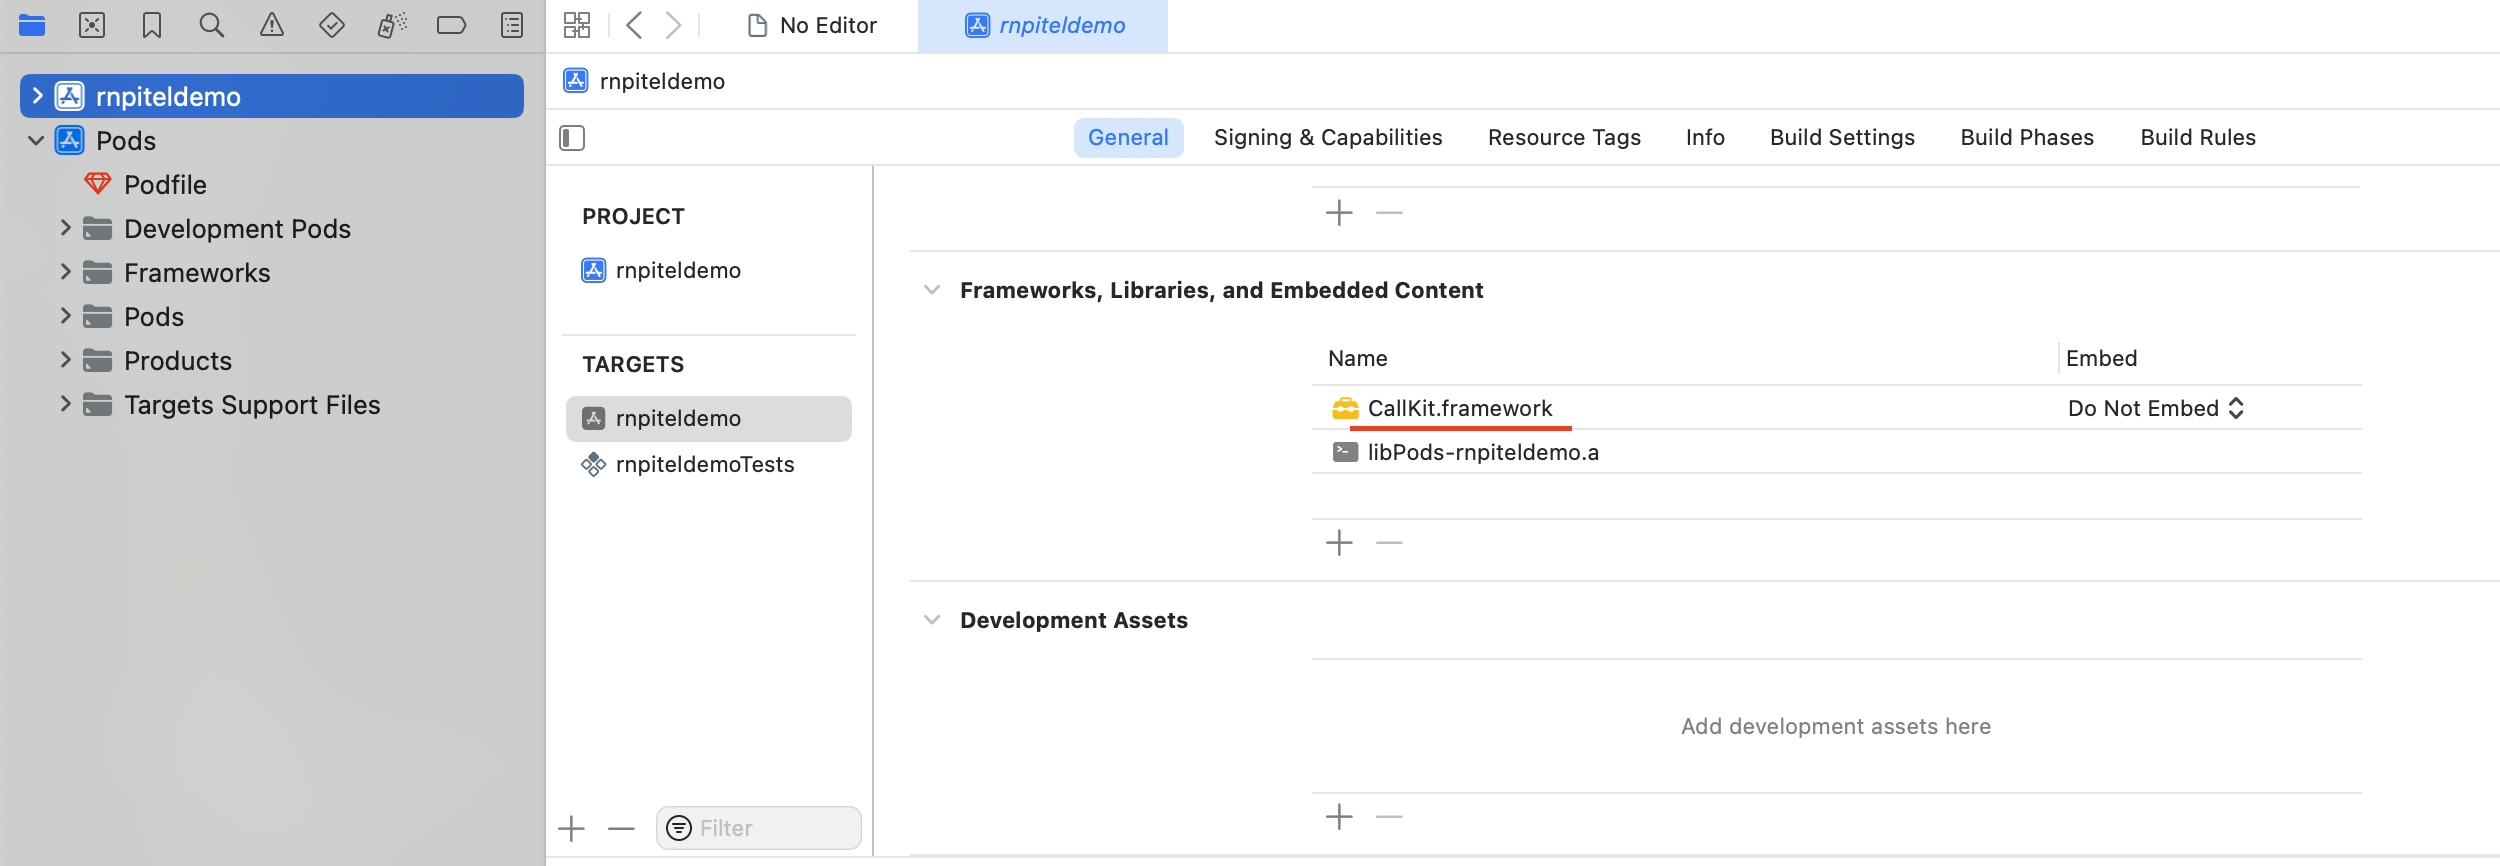
- Open Xcode -> Select your project -> Select tab General -> Frameworks, Libraries, and Embedded Content -> Add Callkit.framework
- Request permission in file
Info.plist
<key>NSBluetoothAlwaysUsageDescription</key>
<string>Need Bluetooth access for voip call</string>
<key>NSBluetoothPeripheralUsageDescription</key>
<string>Need Bluetooth access for voip call</string>
<key>NSLocationWhenInUseUsageDescription</key>
<string></string>
<key>NSMicrophoneUsageDescription</key>
<string>Need microphone access for voip call</string>
<key>UIBackgroundModes</key>
<array>
	<string>fetch</string>
	<string>processing</string>
	<string>remote-notification</string>
	<string>voip</string>
</array>
- Make sure platform ios
12.0inPodfile
# Transform this into a `node_require` generic function:
def node_require(script)
  # Resolve script with node to allow for hoisting
  require Pod::Executable.execute_command('node', ['-p',
    "require.resolve(
      '#{script}',
      {paths: [process.argv[1]]},
    )", __dir__]).strip
end

# Use it to require both react-native's and this package's scripts:
node_require('react-native/scripts/react_native_pods.rb')
node_require('react-native-permissions/scripts/setup.rb')

platform :ios, min_ios_version_supported
prepare_react_native_project!

# Setup permissions
setup_permissions([
  'Bluetooth',
  'Microphone',
])

linkage = ENV['USE_FRAMEWORKS']
if linkage != nil
  Pod::UI.puts "Configuring Pod with #{linkage}ally linked Frameworks".green
  use_frameworks! :linkage => linkage.to_sym
end

target 'ReactNativePitelDemo' do
  config = use_native_modules!

  pod 'Firebase', :modular_headers => true
  pod 'FirebaseCoreInternal', :modular_headers => true
  pod 'GoogleUtilities', :modular_headers => true
  pod 'FirebaseCore', :modular_headers => true

  use_react_native!(
    :path => config[:reactNativePath],
    :hermes_enabled => true,
    :fabric_enabled => true,
    # An absolute path to your application root.
    :app_path => "#{Pod::Config.instance.installation_root}/.."
  )

  post_install do |installer|
    # https://github.com/facebook/react-native/blob/main/packages/react-native/scripts/react_native_pods.rb#L197-L202
    react_native_post_install(
      installer,
      config[:reactNativePath],
      :mac_catalyst_enabled => false,
      # :ccache_enabled => true
    )
  end
end
Config Airplay for audio output (iOS only)
Add files to Xcode:
open ios/<YourProjectName>.xcworkspace
- Right-click on your project folder → "Add Files to..."
- Select
ios/RNAirPlayModule.swiftandios/RNAirPlayModule.m - Check: ✅ Copy items if needed, ✅ Create groups, ✅ Add to targets
Bridging Header:
- When prompted, click "Create Bridging Header"
- Or ensure
<YourProjectName>-Bridging-Header.hcontains:#import <React/RCTBridgeModule.h>
Example
Checkout repo github to get example. Please run the example to understand the process before integrating the package into your application.
Usage
- In file index.js
import { NotificationBackground } from "react-native-pitel-voip"; // Add this line
const options = {
  ios: {
    appName: "app_name",
  },
  android: {
    alertTitle: "Permissions required",
    alertDescription: "This application needs to access your phone accounts",
    cancelButton: "Cancel",
    okButton: "ok",
    foregroundService: {
      channelId: "package_id",
      channelName: "Foreground service for my app",
      notificationTitle: "My app is running on background",
      notificationIcon: "Path to the resource icon of the notification",
    },
    additionalPermissions: [],
  },
};

NotificationBackground(options); // Add this line

AppRegistry.registerComponent(appName, () => App);
- In file App.jsx
// Import this
import { PitelSDKProvider } from "react-native-pitel-voip";
import BackgroundTimer from "react-native-background-timer";
import { LogBox } from "react-native";

LogBox.ignoreAllLogs();
BackgroundTimer.start();

export default function App() {
  return (
    // Wrap your app with PitelSDKProvider
    <PitelSDKProvider>...</PitelSDKProvider>
  );
}
- In file
screens/home_screen/index.jsPlease follow example
Config sdkOption
const ext = `${EXTENSION}`;
const sipPass = `${EXTENSION_SIP_PASSWORD}`;
const appId = `${BUNDLE_ID}`;
const domainUrl = `${DOMAIN}`;
const displayName = `${EXTENSION_DISPLAY_NAME}`; // Display name of extension when incoming/outgoing call.

const sdkOptionsInit = {
  sipDomain: `${DOMAIN}`,
  port: `${PORT}`,
  extension: ext,
  wssServer: `${WSS_URL}`,
  sipPassword: sipPass,
  bundleId: appId, // Bundle id for IOS
  packageId: appId, // Package id for Android
  teamId: `${TEAM_ID}`,
  displayName: displayName,
};
- Register device token & remove device token
const _registerDeviceToken = async () => {
  const fcmToken = await getFcmToken();
  const deviceToken = Platform.OS == "android" ? fcmToken : iosPushToken;
  await registerDeviceToken({
    pn_token: deviceToken,
    pn_type: Platform.OS == "android" ? "android" : "ios",
    app_id: appId,
    domain: domainUrl,
    extension: ext,
    app_mode: __DEV__ ? "dev" : "production",
    fcm_token: fcmToken,
  });
};

const _removeDeviceToken = async () => {
  const fcmToken = await getFcmToken();
  const deviceToken = Platform.OS == "android" ? fcmToken : iosPushToken;
  removeDeviceToken({
    pn_token: deviceToken,
    domain: domainUrl,
    extension: ext,
  });
};
- Wrap your hone screen component with PitelSDK
return (
  <PitelSDK
    sdkOptionsInit={sdkOptionsInit}
    iosPushToken={iosPushToken}
    setSdkOptions={setSdkOptions}
  >
    <HomeScreenComponent
      navigation={navigation}
      sdkOptions={sdkOptions}
      handleRegisterToken={_registerDeviceToken}
      handleRemoveToken={_removeDeviceToken}
      setIOSPushToken={setIOSPushToken}
    />
  </PitelSDK>
);
Properties
| Prop | Description | Type | Default |
|---|---|---|---|
| sdkOptionsInit | your extension info use to login | Object | Required |
| iosPushToken | ios device voip push token | String | Required |
| setSdkOptions | set sdkOption when your extension login success | Function | Required |
- In file
screens/home_screen/home_screen.jsExample
Note
Make sure "PitelCallNotif" must wrap on the first screen (the first screen that appears when opening the app).
// Register your extension to PBX
const {
  callState,
  receivedPhoneNumber,
  registerState,

  setCallState,
  registerFunc,
} = useRegister({
  sdkOptions: sdkOptions,
  setPitelSDK: setPitelSDK,
  extension: ext,
});

return (
  <PitelCallNotif
    callkitSetup={callkitSetup}
    pitelSDK={pitelSDK}
    setCallState={setCallState}
    callState={callState}
    isLogin={isLogin}
    isCallOut={isCallOut}
    setCallID={setCallID}
    sdkOptions={sdkOptions}
    registerFunc={registerFunc}
    setIsCallOut={setIsCallOut}
    onCreated={handleCreated}
    onReceived={handleReceived}
    onHangup={handleHangup}
    onIOSToken={(iosToken) => {
      setIOSPushToken(iosToken);
    }}
  >
    ...
  </PitelCallNotif>
);
Properties
| Prop | Description | Type | Default |
|---|---|---|---|
| pitelSDK | pitelSDK get from params of route | Object | Required |
| callkitSetup | set information for callkit request permission | Object | Required |
| setCallState | set call status | () => void | Required |
| isLogin | app login/logout status | bool | Required |
| isCallOut | call direction status | bool | Required |
| setCallID | set call direction | () => void | Required |
| sdkOptions | received sdkOptions when extension login success | Object | Required |
| registerFunc | register extension | () => void | Required |
| setIsCallOut | set call direction is call out | () => void | Required |
| onCreated | make outgoing call | () => void | Required |
| onReceived | received incoming call | () => void | Required |
| onHangup | set hang up | () => void | Required |
| onIOSToken | ios voip push notification | String | Required |
- In file
screens/call_screen/index.jsExample
import React, { useState, useContext } from "react";
import { PitelCallKit, PitelSDKContext } from "react-native-pitel-voip";

export const CallScreen = ({ route, navigation }) => {
  const [mute, setMute] = useState(false);
  const [speaker, setSpeaker] = useState(false);
  const { pitelSDK } = useContext(PitelSDKContext);

  const { phoneNumber, direction, callState, callID } = route.params;

  return (
    <PitelCallKit
      pitelSDK={pitelSDK}
      callState={callState}
      phoneNumber={phoneNumber}
      direction={direction}
      callID={callID}
      enable={true}
      onHangup={() => {
        pitelSDK.hangup();
      }}
    />
  );
};
| Prop | Description | Type | Default |
|---|---|---|---|
| enable | enable = true to enable call out going | bool | true |
| pitelSDK | pitelSDK when extension login success | Object | Required |
| callState | call status | String | Required |
| direction | call direction | String | Required |
| callID | incoming call id | String | Required |
| onHangup | hang up when end call | Function | Required |
How to test
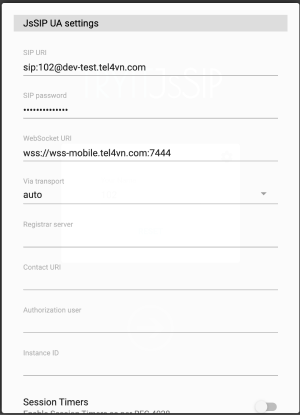
Using tryit to test voip call connection & conversation Link: https://tryit.jssip.net/ Setting:
- Access to link https://tryit.jssip.net/
- Enter extension: example 102
- Click Setting icon
- Enter information to input field
- Save
- Click icon -> to connect